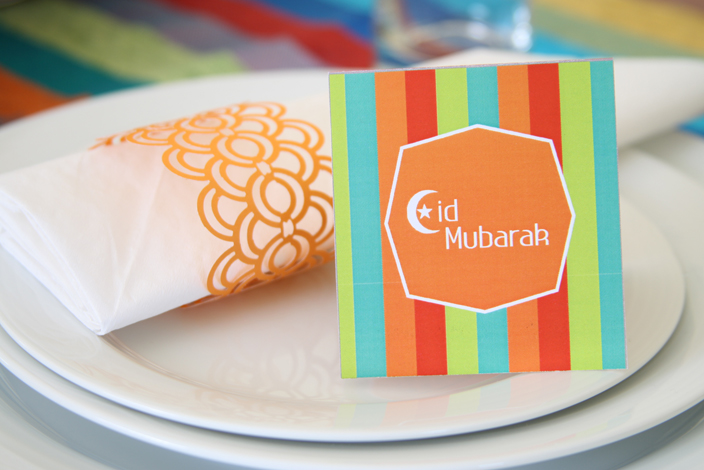
In the craft world, there’s no denying the divinity that is Martha Stewart.
She’s converted homes into temples of clever creativity, where even the mundane can be made magical by a little embellishment.
Her products are equally transformational; they simplify the act of crafting and bring a dimension of quality to your projects.
You’d be hard-pressed to find a paper crafter who does not rave lyrical about Martha Stewart’s paper punches.
Not only are they well-made and sturdy, they produce intricate papercuts and add real flair. You’ll covet them all.
While owning the entire catalogue may not be an economically viable option for you, there are ways to extend the use of the craft punches you already have.
I found a fantastic tutorial on YouTube that shows how to get more out of your Martha Stewart edge punches (click here to watch). It also provided the inspiration for these punched-paper napkin rings.
Use decorative papers or upcycle co-ordinating bits of scrap paper for this project.
If you have a Martha Stewart deep double-edge craft punch like this one, you can skip steps 5 and 6.
Step 2:
Slot the paper strip into the punch, lining up its edge with that of the punch. Use the picture as a reference.
Steps 3 and 4:
Punch down on the paper. Remove the paper strip and line the punched out pattern with the guides on the punch. Continue to punch along the side of the strip until you have about a centimetre of un-punched paper on both ends.
Steps 8 and 9:
Use a craft knife or die-cutting tool to make notches on the ends of the strip. Double-sided tape works equally well to join the ends to form the completed napkin ring.


Here I thought you went and cut out each and every single one.
I forgot that you had a library of punches! 🙂
It looks wonderful. I love the design, the colours and the overall setting.
It must have been a fun Eid meal + setting 🙂
Thanks:)
If only I had the patience and dexterity for papercutting:)
I enjoyed the planning and preparing so much that I’m going to make it a tradition each Eid to include some kind of craft element.
these look great! i like the summery colors 🙂 do you know where i could buy a gift tag punch online (locally)?
We brought back a throw/tablecloth from Morocco that had these beautiful stripes of colour. I just had to go with it:)
I got my tag punch from these people at one of the Hobby-X shows – http://www.forevermemories.co.za/getmodule.php?id=listitems.php&dowhat=details&code=637571
I’ve never purchased online from them though.
Scrap-a-doodles has these ones in stock http://www.scrap-a-doodles.co.za/products/Fabscraps-%252d-Punches-%252d-XXL-Punch-%252d-Tags.html
I’ve had really great experiences buying from them online, it’s a pity that they don’t have this punch in stock right now- http://www.scrap-a-doodles.co.za/products.php?product=Marvy-%252d-Extra-Large-Tag-Punch – it would make fantastic looking tags.
Thanks, I’m going to check them out 🙂
These are beautiful. I’m going to have to make these for celebrations coming up in our family.
I’d love to see what you come up with. Thanks for popping by Leanne:)
[…] the holidays using paper punches. Follow the step by step tutorial on Soul&Paper here — Punched-paper napkin rings. You may also […]
What a great project! 🙂 I’ve featured this post on Craft Gossip here:
http://homeandgarden.craftgossip.com/punched-paper-napkin-rings/
If you would like a “featured by” button, you can grab one here:
http://homeandgarden.craftgossip.com/grab-a-craft-gossip-button/
Thanks Amanda:)